Back to the Defender 110 Section
1993 NAS Defender 110 Station Wagon #342/500
Roll over repair and upgrades

This 1993 Defender 110 has come to us from VA for repairs from a roll over accident. Sadly, this 110 is really messed up. Just about every panel on it was trashed and the frame was damaged in the impacts during the accident.

Here you can see that not only did the body panels sustain damage, the entire upper body section of the 110 was swayed to the left. This means safari cage damage, T support damage and even the bulkhead was wrecked past the point of being able to be re-used.

The RH side of the 110 was ground off in a lot of places as the 110 skidded down the road in this side.

The LH side looks to be were the impact that started the roll over took place and everything on this side is trashed. The tub, the doors, safari cage, etc. Take a look at that rear safari cage hoop and look how extended the angle of the bend is, ouch.
OK, so there is the bad news. The entire body, safari cage and frame are basically junk. The good news is that because of ECR's parts inventory for NAS Defenders and our ability to fabricate items that Land Rover North America says are "No longer available," we can rebuild this 110 for the customer, and even make it better than it was when it left the factory in 1992. Along with the repairs to the 110 we will be adding a new galvanized frame, a new Pursuit 4.6 engine, upgrading the truck to 4 wheel disc brakes and much more.

As tear down begins the few body panels that we can save are removed so that they can be prep'd and painted to match all the new panels on the 110. Even some of the old panels that have damage can be saved, like the front grill panel. This fiberglass piece can be reworked by our in house fiberglass guru and then primed and painted to be as good as new.

As tear down continues on the body of the 110 the new parts are seam sealed, primed and painted. Here you can see the 4 new doors for the wagon have been prep'd and primed with no less than 3 coats of PPG epoxy corrosion resistant primer (most shops apply one coat) and at least 3 coats of PPG Alpine White top coat for a deep gloss and long lasting paint protection for these panels. Once the paint cures in our state of the art bake booth we will start to transfer over the glass and such from the old doors, replacing what we need to as we go.

Why do we seam seal all our Defender doors? If you look at the image of the old damaged door above you can see small gray dots along the bottom of the door. These aren't dots, that is corrosion eating through the panel. If you grind it down and fill it with filler, like most shops do, it will come back within 6 months. The only cure for this is a new door that is seam sealed to keep the water out. You can also see another common Defender problem that we will address on this 110. The old door hinges are really ugly with rust and chipped paint. We'll be installing a full new set of upgraded hinges to make sure these rust bleeds are gone for the long haul.

Here you can see the 110 is continuing to be taken apart and the salvageable old parts are blended with the required new parts to make panel assemblies that will later be ready to bolt onto the new body structures once the new frame and bulkhead are in place.

Here you can see one such assembly taking shape. The new body panels have been primed and painted in the correct Alpine White and then the fender skin and the inner fender are joined with the mud shield that is original. Then these larger parts are set aside for later install.

This image shows the new doors being put together into complete assemblies on the LH side. The door shells have been primed and painted and now the guts of the doors, windows, locks, handles, tracks, latches, etc., are transferred from the junk door to the new shell. New parts are installed as needed to make everything correct. The orange arrow above points to the new style door hinges that will be used on this 110. These will combat the rust and will work and look much better. For more hinge info go here. The doors are temporarily hung on the old body shell so that they are easier to work on. Once the door assemblies are complete they will be removed and set aside while the main body of the 110 is rebuilt.

To get everything straight and right in this 110 means a new frame and a new bulkhead. The original bulkhead was wrecked in the roll over and was starting to corrode pretty badly. We found that rust hiding under a new coat of paint that was trying to cover the corrosion. To make things perfect we will be starting with the new factory bulkhead you see above. It will be slightly modified to fit the NAS 110 and then seam sealed to help prevent rust and then epoxy primed and painted.

Here you can see the new bulkhead after all the paint and primer has been applied. Unlike the local shops we run parts through 3 coats of primer and 3 coats of top coat for a deep shine and long lasting corrosion resistance.

One of the only body panels that didn't get messed up past the point of no return on this Defender was the hood. Above you can see that we have reworked the hoods damaged areas and soon we will be giving that new primer and paint as well to match the rest of the 110.

Here you can see another one of the needed new panels, the rear body tub. The new tub has been modified to fit the NAS 110 and then we have treated it to 3 coats of epoxy primer and 3 coats of Alpine white paint. In the image above one of our paint crew is laying on the final coat of white on the inside of the tub.

This image shows the reworked hood now looking good as new. It and the other completed panels now wait for the assembly to begin on the 110s new galvanized frame.

The rear roof panels were also good on this 110, so we have removed them and removed the windows in order to get good paint overage on them without tape lines. If you could see the horrible condition and all the visible paint scratches on these old panels from some other paint work that has been done to this 110, you'd cry to know that some body shop actually let this 110 out the door with that kind of workmanship. Needless to say once the panels are painted by ECR they will be top notch.

Now that the majority of the paint work has been done on the 110 it has been moved to the mechanical shop inside ECR. Here we will gut the entire truck in order to make the repairs and upgrades. This 110 is getting a new frame and a new bulkhead, so nothing will be left untouched, every line, every pipe and every wire has to come out of, or off, the Defender so that it can be assembled on the new galvanized frame. One of the reasons insurance companies "total" trucks like this is the dollar figure that it takes to get them correctly repaired, but the good news is that with a new Pursuit 4.6, new panels and a new galvanized frame, this 110 will be better than any factory 110 ever produced.

Here you can see we have started to remove the systems in order to get the engine out and swap it for the new 4.6. The impact of the roll over was so hard it even broke the fan, wow. Once the engine is removed we'll get to work swapping its parts over to the new Pursuit engine and getting things ready to start assembly of the new rolling chassis.

This image shows the old 3.9 removed form the 110. We have stripped off the parts we need to re-use on the new Pursuit and cleaned them up for install. The old 3.9 did an OK job, but the Pursuit 4.6 will do a much better job, especially when moving around the weight of a 110.
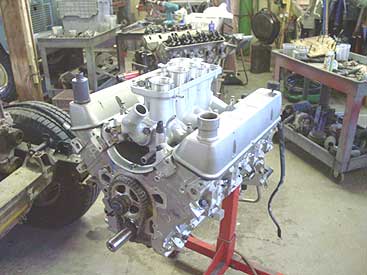
Here you can see the new Pursuit 4.6 getting set up so that it will be ready to be installed in the new galvanized chassis when the time comes. 280HP vs the factory 163HP makes a huge difference in the driving manners of a 110.

A little comparison of the stock 3.9 intake and the new Pursuit 4.6s intake show just how we get reliable 280HP from a 4.6. It is all about air flow and as the image above clearly shows the Pursuit is going to flow a ton more air. More air and more fuel means more power.

That incoming air from the intake is then removed from the engine via larger valves and fully reworked heads. You can see in the image above the exhaust ports are larger and gasket matched for better flow, and better flow means more power.

Now that we have the engine and drivetrain out of the 110 we will begin to gut the interior and get things ready to cross over to the new galvanized frame. Sadly, we could not use our frame swap system on this 110 as so many body panels are damaged. This one we have to do piece by piece. Normally that isn't too bad, but on this 110 we have a lot of extra work to do due to some custom work that was done on the interior of the 110. It has some nice upgrades, but the people who installed it never thought about future repairs. Everything is hard wired or glued in place, and the only way to get it out it to cut it loose, then work on fixing it when we assemble the body on the new frame. Each modification that ECR does keeps in mind future repairs. If we install a sub woofer or a set of gauges, we install wire disconnect points and easy removal points so that the new custom items can easily be removed in case of future serving. That is one of the benefits of using ECR instead of your local shop. We know these vehicles and what they need inside and out, and it doesn't matter if that need is today or 5 years from now after an accident. All our work is done in a factory style, so that service and even extensive crash repair like this is easy. Your local shop doesn't think this way, so in the long run it costs the customer a lot more money to do things twice. Do it once, do it right and have ECR do it.

Here you can see the new Pursuit 4.6 fully built up and ready to mate to the gearbox and be dropped into the new galvanized frame.

The back bone to any good Defender project is a new galvanized frame. The heavy duty frames are tough as nail and galvanized so that rust will never be a factor in the rest of this 110s life.

The new Pursuit 4.6 engine is cradled into the frame and then mated to the original 5 speed gearbox with all new clutch parts.

Along with the more powerful Pursuit 4.6 engine we are also making some upgrades to the stopping power of this 110. Here you can see we have installed a rear disc brake Salisbury rear axles into the 110s new chassis. This replaces the original drum brake rear axle and will make both the stopping power better and the service-ability of the rear brakes easier.

Along with the longevity provided by the galvanized frame we are also making some of the other systems "long term" as well. Here you can see the new stainless steel brake pipes being set up on the chassis before the body goes on. These stainless lines with stainless fittings will resist corrosion and mean the end of rotted and dangerous old brake pipes.

To match the stainless steel brake pipes are our stainless steel fuel lines. As you can see above the lines are computer made for an exact factory fit with all the correct bends so that they clip right into the factory locations and will provide years of service even in the harshest environments due to the high quality stainless steel construction.

The engine side of the SS fuel line set up is also factory correct with the correct fittings to mate directly to the EFI system on the new 4.6 V8. Also notice in this image the new front axle has been installed and the addition front sway bar has been hooked up. Stock NAS 110s only had a rear sway bar.

Now that the drive line has been completed it is time for the body to tape shape. The rear tub has now been installed and the new T supports are being loosely fitted. To make the body gaps and door lines on a 110 5 door fit correctly everything must be mocked up and then adjusted and then tightened down. This is the only way to secure the correct look and function for all the doors and to make sure no water or air leaks exist. Next we will install the bulkhead and work towards installing the roof section.

Once the rough body lines have been established we can begin to lock down the panels. The nest stage before the carpets and wiring go in is to install sound deadening material throughout the 110. This will keep road noise to a minimum and make the 110 a very comfortable ride. Above you can see the layer of dyna-mat extreme applied to the rear body sections.

Here you can see we have installed the new bulkhead and the next step is vehicle controls. Steering, brake and clutch boxes and the laying in of the wiring harness. The harness looks like a huge pile of spaghetti at this point, but soon it will all be laid out and routed correctly to the key points inside the 110.

Now that the brake and clutch boxes have been installed we have finished up the brake and clutch hydraulic systems. As you can see by the arrows above both the brakes and the clutch benefit from full stainless steel pipes for long life. Next we will bleed and leak test all the hydraulics.

Here you can see we have started to assemble the roof and roof side panels. This is done with all new seals so that no water leaks will happen to this rebuilt 110.

Another image, a little further along as more panels are going into place and the carpets that go under the seats are starting to be installed. Body line up is critical at this point or the doors will never open and close properly, so a lot of time is spent making sure the body lines and door openings are correct. This assures that the doors will fit right in and close with a gentle push, not a slam like on most non-ECR Defenders.

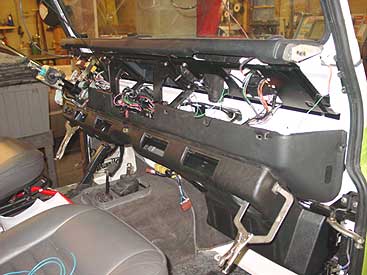
Inside the 110 we have started to sort out the wiring and install the upgraded 2006 spec. dash assembly. This new style dash is blended with the original NAS wiring harness to not only give a better location for the radio, but also easier to use switch gear and it allows the 110 to have vent flaps for fresh air into the cabin.

Outside the 110 is starting to look like an NAS 110 again with the rear sections of the safari cage fitted. The seats, carpets and other interior trims are also starting to make their way into the Defender as mechanical items are completed.
Here you can see the new AC system being installed. The factory AC system on a 1993 NAS 110 was a mass of over-complicated switches and vacuum operated motors. To remove all that and give true AC that will blow ice cold we are installing the latest generation Defender AC system into this 110.

Before the AC system can be finalized we have to relocate the EFI ECU, so while we had it on the bench we installed the needed ECU computer chip upgrade that will allow the EFI system to get the most out of the new Pursuit 4.6. Without this upgrade the EFI system would still think the old 3.9 was still under the hood, and that is no good.

While we are on the subject of circuit boards, we have one to remove. This little device is the "signal conditioner". Land Rover installed it to trick the NAS 110 temp. gauge to read close to normal all the time. Removing this device so that you can see the true engine coolant temp. is something every NAS 110 should have done. Fort more details go here.

Another change that all NAS 110s need is an upgrade to either new or performance oil cooler lines. Above you can see the new ECR ROX oil cooler lines installed in this 110. This set up eliminates a dangerous aspect of NAS 110s and looks good doing it. For more details on the NAS 110 oil lines go here.

This image shows the exterior bodywork coming together. The full safari cage is now in place and the doors have been hung and lined up to not only look correct, but to open and close easily with new style Defender hinges and a full SS hardware kit.

The front clip of the 110 has also been installed and the gaps on the hood and fenders are all now being adjusted so that nothing rubs. The nest steps are to continue with the system install and start adding in the new sound system and get the new 4.6 Pursuit engine ready for start up.

Here you can see the upgraded headliners have been installed and the interior is starting to go into place. The upgraded headliners utilize 2 interior lamps, one over the driver and passenger for easy map reading, and one in the rear so that you can see your cargo. The stock NAS 110 had one small interior light mounted behind the interior roll bar, so very little light got to the front of the cabin. We also go a step further with this upgrade and add a rear door switch so that if you open the rear door the interior lights will come on, that didn't happen in a stock NAS 110.

This image shows the new dash nearly complete. All the factory items have been wired in and tested. The only items left are to install the sound system and button up the dash top.

The customer also has decided to go back to stock NAS 110 steel wheels, and remove the alloys. So we have painted up a set of new 110 wheels that will go on the 110 and will offer a wider, more stable track, and a more factory look.

This 110 came to us with ultra heavy duty springs in it, thus giving the 110 a large lift. Sadly, whoever did the install only went half way, they just installed the springs. They did not correct for rear shock length, correct the front axle caster or make any of the other changes needed to make a 110 with this much lift drive smoothly without getting twitchy, or over extending the suspension parts. We will be fixing the install with all the needed parts to make this 110 drive as it should, even with the heavy springs and lift. First step is to correct the caster on the front axle. To that end we have removed and altered the radius arms so that steering feel will be correct. Next we'll get going on the rear shock drop kit, rear trailing arm bushing correction kit and then send all these items to our paint dept. for epoxy primer and paint. Its easy to make a lifted 110 handle well, but you can't do that by just slamming springs into one.

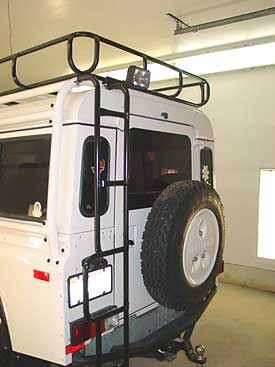
Here you can see the body set up has been done and items like the new roof basket and the rear ladder have been installed making this 110 look nearly complete. Next we'll continue with the interior installation, start building the ECR ROX sliders and get the new ARB winch bumper installed.

This image shows the suspension set up correctly on the lifted 110. The corrected radius arms are now painted and installed and we also installed an ECR ROX tie rod guard to protect the tie rod from harm in case the owner wants to do a little off roading. While we where at the front we also set up the front axle with vented performance rotors and calipers to replace the old solid discs that came on a NAS 110.

Inside the 110 we have installed the majority of the interior, including the custom leather, heated, seats that this 110 already had prior to the accident.

Outside we have started to finish up all the small details needed to get this 110 back on the road. Lights, flares and much more have now been installed.

Under the new hood the new Pursuit 4.6 is doing well and has been bench tested in the shop with perfect results. This image also shows the new heat and AC system in this 110 that does away with the troublesome factory parts.
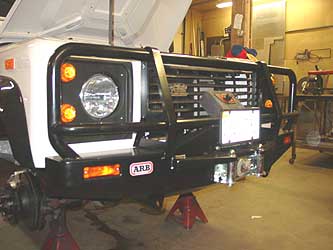
For added protection and functionality we have added an ARB winch mount front bumper with the customers original Warn winch. This set up might just save your butt off road, or it might protect the front end of the truck from some on or off road obstacles, no matter what it is a win-win situation.

Back inside the 110 we have completed the new updated dash and interior, other than installing the new Alpine CD head unit with XM radio. Next we'll install the new radio and get ready for some road tests to make the 110 ready to head back to VA.

Here you can see the ECR ROX sliders have been installed. These units are tough as nails, have Hi-Lift jack points front and rear and these ones blend in nicely on the 110 as they are coated in Alpine White to match the rest of the body. In body color these are a great off road/ protection items that doesn't scream "add on".

Inside the 110 everything has been buttoned up. The updated dash and AC system has been installed and tested.

The new style dash makes a 110 a much nicer place to be as everything is within easy reach and the dash mounted radio allows for possibilities like DVD players, navigation and more.
Another small but important upgrade, especially with the dark window tint on this 110, is the addition of a Hella twin lamp work/ reverse light. The 3 way switch we install means you can use this along with your reverse lights, automatically, or you can turn it on manually to help you load gear into the 110 or set up camp at night.

Here you can see the 110 undergoing some high heat tests in our spray booth. After some shake down miles to make sure everything is 100% we'll get the 110 loaded on the transport and headed back to VA. Some folks as why we spend so much time testing vehicles, the reason is that there is nothing worse that getting a car back that has a minor problem. Because we triple check and test everything before you get it back you are assured that when your Defender arrives you can turn the key and enjoy it, as you should.

This image shows the completed 110 now ready to head back to VA. The 110 now has a galvanized frame, a new Pursuit 4.6, modern dash, better AC, stainless lines and pipes, better paint quality than the factory ever dreamt of and more. The 110 is now ready to do whatever is asked of it and last longer than Land Rover ever intended, key principles here at ECR.
If you have Defender needs, anything from a new set of door hinges to a complete rebuild of a rolled over wreck, contact ECR. We'll be happy to make your Defender world class... just like this one.