Back to the Table of Contents
As ECR handles more 90s and 110s that anyone else in the USA we wanted to share some common threads with you.
The NAS Defenders are wonderful vehicles, but there are a few things you should know.
Oil line fires:
As The NAS Defenders were built from the Fall of 1992 to the Fall of 1997, they are all getting up there in years. The oil cooler lines in these Defenders are getting old and suffering from dry rot and cracking. This is normal wear, but you need to periodically replace these lines to prevent an engine fire. Running rubber hoses that close the exhaust manifold is not a wise move, and there is a better solution than anything to do with the factory lines.

So unless you want your Defender to look like the ones on this page, replace your lines with ECR's performance units. The fires start in the RH front area of the engine bay and spread backwards and down the RH side. We have sadly seen the results of this many times. These engine fires, that a number of 110s and 90s have succumb to across the country, are the fault of an oil cooler line that has burst, misting oil onto the RH exhaust manifold, then igniting and causing a fire.

Here you can see the trail of oil this Defender 90 left as it rolled to a stop on fire! Luckily no one was hurt in this fire and the owner of the Defender caught these pictures with his phone.

Here is the spot where a Defender 110 caught fire. You can clearly see the oil trail that was coming from near the RH side of the vehicle before it came to rest on the side of the highway on fire!

Afterwards that 110 looked like this and it is still at our shop awaiting full restoration to repair the fire damage. Defender 110s and Defender 90s suffer from this issue.

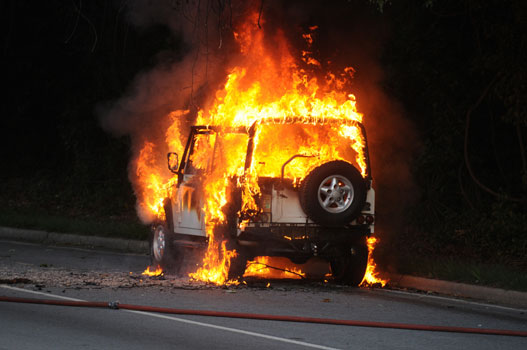
Here is a Defender 90 that was caught in the act, luckily no one was hurt.

This image shows the aftermath of yet another Defender 90 oil line fire.
We have even seen 110s that had perfect condition oil cooler lines, with low miles, fall victim to an engine fire, so a good set of factory lines are no safe bet at all. As you would expect, Land Rover North America offers no explanation of why this happens and they put it down to "operator error". Updated parts are cheap insurance to try and prevent against this, so be sure to have your 110 or 90 lines replaced with upgraded units.
The ECR ROX oil line solution for all NAS Defenders, 1993-1997:

