Back to Phase 1 of this 110 Project
1993 NAS Defender 110
refurbishing with galvanized frame and Camper conversion
The interior of this 110 was inspired by the Land Rover Dormobiles from the 1960s, but built to a completely modern standard with a more expedition mind set. Fitting a camper full of equipment, and making it all work together in the confines of a Defender 110 is no easy task, but at ECR we are always up to the challenge.

The first step was to lay everything out and make sure all our vital systems had the space they needed. One of the most vital systems was the frame mounted safari cage. This image shows the interior location of the LH support. As you can see with the custom made tub side, everything had to be custom made, but this fully supported safari cage will offer great protection if the worst would happen. In this image you can also see the filler for the on board fresh water tank.

The interior of the custom safari cage looks close to that of a stock NAS Defender 110 to keep the overall "look" of this Defender. Here we have also installed the front headliner, interior lighting and are starting to run the wires for the camper section of the Rover.

The frame work for the interior structure is made from aluminum for weight savings. Every item that will reside in this 110, from recovery equipment to spare parts will have a built in space for it to be tied down. That way everything is organized and safely locked down during on and off road travel. In this image you can see the frame work for the LH side of the 110. This area will house a work surface, storage boxes, power distribution panel and much more. You can also see that we have installed a window in the 3 door roof side to allow more light into the cabin, we also custom made the interior trim piece for the window.

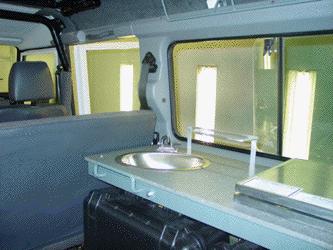
As the racks were finished up and painted, we custom made carpets for the cabin area and installed them to really give the cabin a finished look. Here you can see the RH side of the 110 with the wiring, plumbing and interior trim in place. This area will hold a sink with running water and a stainless steel 2 burner LPG stove. These will be installed in our custom made Corian counter tops on our custom built aluminum framework.
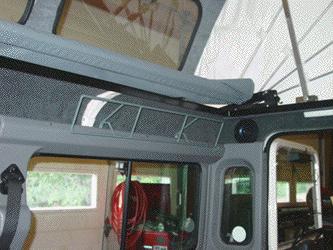
We are also finishing off the upper section of the cabin area. Here you can see we have upgraded and relocated the rear speakers and fully finish trimmed the elevating roof. We also installed a sleeping bag rack for dry storage of the sleeping gear. In this image you can see the interior of the roof system and the RH bunk in its folded position.

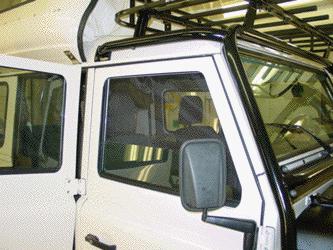
Here you can see the window we added on the LH side from the outside, and you can also see the stainless steel latches that hold the elevating roof down for road use, as well as the fresh water tank fill. Also notice that all the details such as a correct NAS marker light have been installed as we build up the 110.

To make the ECR Defender 110s better than the factory ones, we also change some things that just don't hold up over time. The covers over the footwells in 110s were made from cheap cardboard and they sag and fall off almost immediately. We re-make these panels from heavy duty materials and cover them in the correct Hardura fabric for a factory look. These units will stand up to mud and foot traffic and will stay in place. Just another of the small details that set our vehicles apart.

In this image you can see that the aluminum frame work has been painted and the panels are starting to go in and get wired up. This panel holds the 12v distribution panel for the cabin of the 110. It controls the ARB fridge, water pump, cabin lights and more. The panel also holds a 600 watt 115v invertor for running your household items, another 12v power point, a digital voltmeter so you can check the battery condition at a glance as well as the controls for the dual battery cross over system.

Above the power panel and the window we mounted an external speaker for the CB radio, as well as a 12v 2 speed fan to keep things cool. You can also see some of the cabin interior lights going in at this time.

We installed the CB radio behind the cubby box and built what we call a "roll cage" for the unit. This keeps items in the Rover from damaging the CB, and it also has a nice round edge so that nothing catches on the edge of the CB case. In this image you can also see the hot water shower cross over valve mounted below the CB (the yellow and red handle). This valve allows you to shower by using water from the on board water tank, or you can use a long pick up hoses that is supplied with the unit to pull water from a pond or stream. The unit has a pre-filter to protect the pump and is really a great set up.

Looking backwards you can see the rear interior light mounted and wired as well as the final trimming that was done around the roof set up.

On the LH side of the body we installed an ARB Fridge/Freezer. We custom made this aluminum bracket to securely lock the fridge in place while underway. We also used the space behind the fridge for storage of jack handles and more. With a place for everything and everything held in place securely this 110 is safe and well set up.

This image shows the completed 300 Tdi install into the 3.9 EFI V8 engine bay. We change every detail so that it looks correct, and even better is engineered to be a Tdi, not a Tdi "conversion". This 110 not has plenty of power on tap as well as a monstrous driving range, no EFI or other sensors to go bad, and nearly 30 mpg to boot!

Here you can see the modifications needed to set up this 110. The tire rack not only holds the tire, a HI-Lift jack and 2 cans, but also holds the LPG tank for the stove. The tank is locked in place to keep thieves away and the locked fuel tank means that they can't get to your spare tire either. Here you can also see the rear mounted work light and the CB and GPS antenna mounts, as well as all the standard NAS 110 equipment.

In this image you can see the nearly completed interior. The "60" portion of the 60/40 split bench seat has been used to give the 110 the ability to carry a number of passengers in seat belted safety, while the "40" section has been removed in favor of equipment storage and camping needs. Notice that the interior is completely finished with all the correct NAS color codes.

Under the seat we stashed the hoses for the hot water shower system so that they are secure and handy, but out of the way.

This image shows the power distribution panel in its finished form.

The RH rear of the 110 houses the sink, stove and lots of storage. The Pelican cases that tuck under the counter are waterproof and tough as nails. These units secured in place give a ton of storage and also leave lots of space to load even more gear in the rear cargo area.

The LH side houses more storage and the ARB Fridge/Freezer. All the items are secured in place for trouble free, and rattle free on and off road use. In this image you can also see that all the space gets utilized. By installing a smaller Pelican case higher up we used valuable storage space that would normally be wasted.

Here you can see the LPG 2 burner stove. This stainless steel unit give lots of heat for cooking and is long lasting.
The pressurized water sink means easy clean ups and many great uses. We also fabricated small racks around the sink for the customer's soaps, dish rags and more. The Corian counter tops mean durability and longevity, just like the rest of the 110.

This images gives a view looking down into the 110 from inside the elevating roof system. The roof panel gives you a roof vent for air flow as well as 2 full size bunks for sleeping, and don't forget the full standing headroom! Here you can see that the RH bunk is folded up.

This image shows it open and ready for bunking.

Here you see both bunks open.

This image shows the fridge unit. It has 30 lts of storage space and runs on both 12v and 115v power and is very quiet even in Freezer mode.


The elevating roof system works very well and folds up with no effort. The images above show the roof system from some various angles.

What camping trip or expedition wouldn't be complete without bugs! To address the bug factor we fabricated these screens that go on all the doors and the roof vent. They velcro to the door frames and secure tightly. The great thing is that you can regulate the air flow in the cabin by just rolling the window up and down, and you won't have to worry about bugs getting in at all.
This image shows the screens from the outside with the window part way up.

When not in use the screens roll up neatly and store behind the ARB Fridge.


Here you can see the finished panel and rack system on the LH side of the 110.

Another difference in the ECR Tdi re-powers is that we use all the correct Tdi parts. In this image you can see the correct Tdi dash display has been used that houses the "glow plug warning" light and more. No detail is too large or small for ECR.

For getting around, we installed the customer's GPS III Plus system. We mounted it to our custom dash swivel mount that mounts in place of the Defender ash tray and allows easy access to the unit by both driver and navigator. Please excuse the dust on the dash, lots of work going on in this 110.

Speaking of dust... The modified Mantec raised air intake on this Tdi 110 will make sure it is always breathing clean air and will help in case a deep water crossing is needed. In this image you can also see that the ECR built safari cage has been primed and painted in the correct satin black. Also notice the stainless steel limb risers that lead from the roof rack to the Safari Gard bumper to deflect brush away from the windscreen.

At the rear the high mounted CB antenna and the high mounted "Mighty Mouse 2" GPS antenna will make sure the ECR 110 stays in touch, and knows its position. We fabricated this HD mount system to tackle off road hazards and not break the antennas or damage the Rover.


This is the completed ECR Defender 110 Expedition vehicle. Built with every off road upgrade we could think of, from Old Man Emu springs to a GPS system and ECR ROX sliders to HD CV joints, as well as every comfort we could think of for camping from an on board water supply and hot water shower, to bug screens and 2 built in bunks. This 110 is ready to tackle anything that the owner sees fit, from his upcoming 2001 Border to Border trek to Labrador, or a expedition across the globe, this 110 is ready for it.
Let ECR know if we can build or modify your Defender in any way. We can handle anything from a simple install of ARB Air Lockers or a new engine, to things that bend your imagination, like restorations of vintage Rovers to world class expedition vehicles... just like this one.
ECR... your one and only US source for custom Land-Rover vehicles.