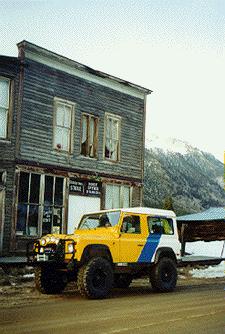
ECR4: PROJECT DEFENDER
ECR 4: Electronics and Gear Storage
Normally when shop projects like ECR4 come along, things get done slowly as we work on the project after hours. However, recently we entered ECR4 into the "Twist Off 2001" event in Colorado and got in! This meant that we had to finish all the small details on ECR 4 to get it ready for the cross country trip, and the competition. Items like the GPS, CB, spare tire mount and such all had to be done, as well as gear storage systems and more. After running numerous Defender 90s we knew what the good points were, and what could be changed, so with that in mind we set out to make the most complete set up upgrades we have done to a Defender to date. Check out the images below, and let us know if we can help you make your Rover one of the best.
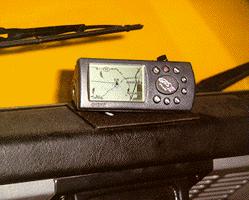
First up was the GPS. We choose the GPS III Plus for a host of reasons (GPS units are a matter of personal taste, so check with your sales staff, or research GPS units on the internet). The GPS III runs off the vehicle's electrical system so we don't have to worry about small batteries and it also has the ability to take a remote mounted antenna. The remote antenna give you much better signal reception, especially with these smaller GPS units. We fashioned a mount for the top of the Defender dash pad that replaced the factory ash tray with no modifications. The mount swivels so that the driver and passenger can easily access the GPS, and if field work is ever required the GPS itself is held to the mount with Velcro so it can be easily removed. I can now say that after 6300 miles in ECR 4 from maine to Utah and back, the GPS mount works great and I am pleased with the GPS III Plus.
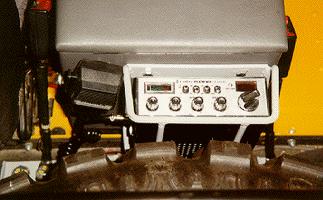
Another mandatory item for any off roader is a CB. We chose a peaked Cobra unit so we could stay in touch over long distances and mounted it behind the center cubby box in what we like to call a "CB roll cage". The cage and CB mount directly to the cubby box, and the cage protects the semi-fragile CB from getting hit by gear in the back.
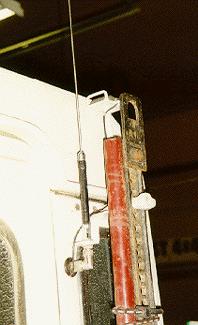
The mounts we fabricated for the remote GPS antenna, the CB antenna and the Hi-Lift jack was combined into one unit. The Hi-Lift mounts to the bumperette at the bottom and then to a stud that sticks out on the bracket. The stud uses a lug nut as the clamp so you are always assured of having the right size wrench to get the Hi-Lift off. The vertical, rear mounted position keeps the Hi-Lift in place, out of the way from off road obstacles and keeps it from rattling around.
The CB antenna was made into this bracket as well. The load of the antenna was kept below the roof line so no damage would happen to the antenna, but the whip is above the hardtop for the best range possible.
The GPS antenna mounts on top of the bracket and has a "roll cage" like the CB unit as well to help deflect tree limbs up and over the antenna unit. The GPS antenna is called a "Mighty Mouse" from the GPS Store on line, and I can't say enough good things about it. It is waterproof, tough and pulled in the best signal I have ever had from a GPS antenna, and it is cheaper than the Garmin units.
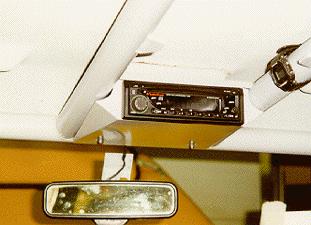
What cross country trip, or trip across town for that matter, would be complete without a good stereo system? We mounted the CD player and all its associated wiring into the 4 point roll cage so that in case water or mud gets into ECR4, we'll have a good shot at not wrecking the electronics. We also wanted a single disc CD player, and not a changer, so we had to mount the unit at a slight angle, and could not use the standard style USA type cubby box. (as single disc head units won't last long at those angles). We selected a Rockford-Fosgate single CD head unit that had a built in amp for as much power as possible, without adding sensitive amplifiers and more wiring that would be against the "keep it simple" ideals of ECR 4. In this image you can also see the "electronic glare reduction" mirror (as found in Range Rovers and NAS Defender 110s) that we installed, as great asset when driving at night.
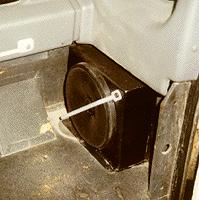
For speakers we used 4 (2 in the rear in custom aluminum boxes and 2 in the factory door panels up front) Rockford-Fosgate 6" speakers with baffles and custom boxes. True, this system isn't going to win any stereo competitions, but it is simple and robust for off road use, and gives very good sound, even over the hum of 35" Super Swampers. Notice that the speakers are also protected by "roll cages". These keep your speakers in tact when you toss your tool box in the back and accidentally hit the speaker.
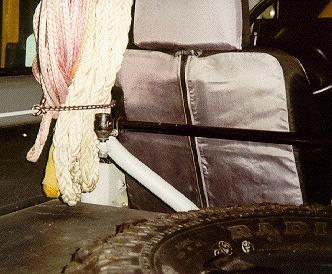
With the electronics installed it was time to turn to gear storage and spare parts. I've always wanted to carry a lot of spare parts for the expedition and cross country off roading we do, but never had any good places to put things that didn't rattle or have the chance to be potentially dangerous "missiles" in the case of a roll over or accident. A few solutions came to me with some of the larger parts "use them as needed items inside the vehicle!" In this image you can see one such case. A bar was needed behind the seats to keep the cooler from sliding forward into the passenger area. So we used a new tie rod, set up with 2 new tie rod ends as this bar. We fabricated brackets to the roll cage and bolted the spare tie rod in place. It not only is a good spare to have on hand, but acts as a great tie down point inside the 90, and keeps gear from ending up in your lap. The spare front drag link and other parts are used elsewhere throughout ECR 4's interior.
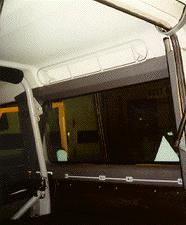
On our most recent trip we started looking around the inside of one of the D90s. All our gear ended up sitting on top of itself on the floor. We saw a ton of wasted space higher up in the vehicle, so in ECR 4 we made racks that duplicate the look of alpine windows that are mounted to the roof and can hold gear, or act as tie down points. The units hold a sleeping bag and bed roll perfectly, so here again, if water or mud gets inside the 90, your bed stays dry. The also hold items in case of a roll over, all your gear will stay put, and not hit you in the head, or break out a window. Also fabricated were tie down racks in the lower portions of the cargo area. These allow you to string up recovery gear and other items so it stays put and is easy to grab when you need it.
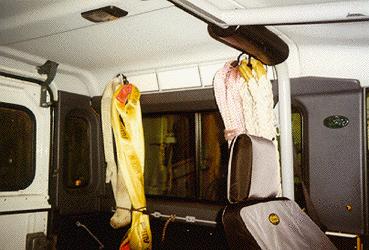
In this image you can see some of the recovery equipment hanging in ECR 4. The tree straps and recovery ropes hang nicely on the side and are ready for a quick grab when you need it. They are held on by shock cord to stay put when you are driving, and also allow easy access when you need to recover someone.
With all these custom made systems in place we carried the following inside the D90 on our recent trip to Moab, UT: full size electric cooler, 35" spare tire, 2 sleeping bags, 2 bed rolls, 2 folding chairs, tent, spare parts, tool box, full camper gear including stove and cooking gear, first aid items, fluids, One 5 gal can with drinking water, One 5 gal. can of diesel fuel, and 2 large personal bags, and with all that gear inside we still had floor space behind the spare tire and had no restricted vision out the back or side windows! A true testament to what you can do with expedition experience and custom additions to your Defender.
Next up, an on board air system designed to fill 35" tires fast, and run the ARB system.