1994 Defender 90 Soft Top conversions
and other upgrades

This Defender 90 has come to us from WI for a conversion and a number of upgrades. The D90 already has a Stage II suspension, but we'll be adding a 3 link system to it for great articulation front and rear, as well as stuffing in a 300 Tdi. This 90 will also be fully upgraded with a Phase 3 turbo and a Phase 2 intercooler. The upgrades combined with the light weight soft top D90 means that this 90 will really rock.

The owner of this D90 delivered the 90 as you see here. Our first step is to go through and remove the rest of the parts that won't be needed and bring this D90 down to a "clean slate" so that we can begin the new engine install. We'll need to remove the engine mounts as well as the gearbox mounts and more.

In this image you can see that we have removed the exhaust manifold and have the stock turbo out on the bench. We'll remove the waste gate actuator and the turbo from the exhaust housing and then install the larger Phase 3 turbo.

The Phase 3 turbo offers more performance because of its larger bore (more air, more boost = more performance). The overall size of the Phase 3 still fits in the factory location and directly bolts up with no modifications, and it offers a very noticeable increase in power when the boost is on. In the image above you can see the stock turbo on the right and the Phase 3 on the left. Notice we've moved the factory waste gate actuator and the other fittings from the stock unit and set them up on the Phase 3. We've also adjusted the waste gate pre-load to offer more boost to the engine.

Here you can see the new R380 gearbox, mated to the new LT230 1.4 ratio transfer case. Next we'll swap over the parts from the old transfer case (such as the handbrake and speedo parts) and get the gearbox set up into the D90 with its new gearbox crossmember.
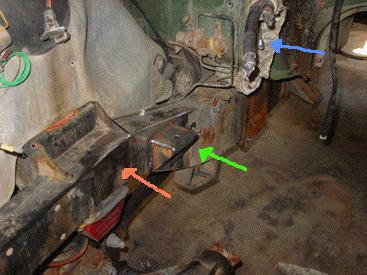
Before we go much further with the engine and gearbox, we have to get the chassis ready. In most of our Tdi conversions we use a new galvanized chassis that already has all the correct mounts built in, but if you don't need a galv. chassis we can modify your existing frame to handle the new engine set up. In the image above you can see that we have done the needed fabrication to install the engine. The orange arrow indicates roughly where the engine mount used to be. We have cut it off with the plasma cutter and then ground it smooth. The green arrow shows the newly fabricated mount for the new engine welded in place. The chassis areas that we worked on will now be primed and then painted in chassis black. The blue arrow at the back points to the new clutch pipe that we have installed on the bulkhead, as the clutch slave cylinder is on the RH side, unlike the old gearbox's LH side clutch slave.
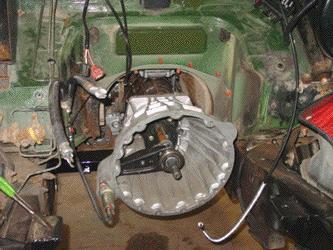
Here you can see the new R380 gearbox in place and starting to be hooked up.

From under the D90 you can see the gearbox crossmember that supports the gearbox, the transfer case and helps strengthen the chassis. These units came in thin black primer, so we have painted the crossmember in epoxy primer and 9300 Black paint so that it won't have any rust problems anytime soon.

This image shows the Phase 3 turbo bolted back onto the engine with all the fittings and connections now in place. A factory fit and a factory look, but with more performance... a great upgrade.

The owner of this D90 plans to install larger tires on his rig when he gets it back, so while we've got the 90 in the shop we'll be installing Ashcroft 4.11 gearsets front and rear so that even with the larger tires he'll still have the same performance on and off road. In the image above you can see we have pulled the rear axles and the front swivel housings and removed the differentials.

In this image you can see that we have disassembled the rear differential and removed the 3.54 gear set. This D90 has Detroit lockers, so we have now installed the Ashcroft 4.11 gearset onto the locker and pressed on the side bearings. The set up 4.11 ring gear, and the matched pinion, now waits for assembly into the differential case. The Ashcroft 4.11s bolt directly onto your stock 3.54 carrier, or locker (Detroit, ABR, whatever) with NO modifications or spacers needed. They are a direct swap. We even provide the ring gear bolts! Also notice that the pinion from the 4.11s has the fine spline drive flange end for a stronger set up.
We run these units on our own rigs and know that they are tough as nails. In all the sets we have sold we have never had a ring/ pinion related failure of any kind, they really are bulletproof. Next we'll move on to setting up the front carrier and then we'll assemble both diffs with new seals and get them back into the axles of the D90.

While the engine is being hooked up in the engine bay, we also need to make some changes inside the D90. The EFI computers are removed and the needed wiring changes are made. The correct dash module is also installed and hooked up in the dash board. As you can see in the image above the new dash module is needed to give you the correct warning indicators (see orange arrow). The conversions are much more than just slapping an engine in your 90, they are well tested, well thought out, full conversions done to our exacting standards making your repowered Rover one of the world's best.

This image shows the newly installed Phase 2 intercooler. This unit is almost 3 times the size of the stock intercooler and offers maximum performance. It is a tight fit, but it does the job nicely.

Here you can see the stock front bodywork around the new Phase 2 intercooler. We've also re-wired the aux. lights and re-connected the customer's Mile Marker hydraulic winch to the new power steering pump.

One of those tricks is the Mantec raised air intake kit, as seen above. The new engine really does offer deep water capabilities, so in this D90's case that raised air intake is good for more than just looks. Now that the majority of the engine systems have been tested, we move on to finishing up the Stage II suspension and the needed 3 link crossmember. For details on the 3 link system go here.

Here you can see the completed 90. We've installed the new 3 link crossmember and done a full road test of all the systems. This soft top 90 with the upgraded engine makes for a powerful combination. This thing moves! After a quick wash down it will be ready to head back to the owner in WI for years of off road fun and pleasure, with its new power, 4.11 gears, 3 link and much more, this Defender 90 is ready for anything.
Let ECR know if we can help you with any of your Defender 90 needs to help make your Rover world class.. just like this one!