Back to the Discovery II Section
2004 Discovery Series II
Off Road upgrades

This nearly new Disco II has come to us directly from the dealership where it was purchased. It will be getting a long laundry list of options and upgrades to make it not only look better, but perform better off road. Once it is complete it will be sent back to the customer in Long Island, NY and it surely will be a stand out at the local mall, and it will be able to back up that gnarly look with real off road ability.

One of the first upgrades is a new Safety Devices full roof rack. These racks are great as they offer everything from aux. light mounting points to a nice perimeter protection around the roof drip edge. This is the same style rack we used on the Discotech project and the same ones used on the Discovery XDs. The rack looks great, but it is just the tip of the iceberg for this Disco II.

To protect the fuel tank and the rear quarters of the Rover we have removed the stock plastic rear bumper and installed a new Safari Gard wrap around rear bumper and fuel tank skid plate. The bumper also houses a receiver tube for rear recovery points.

Up front we have removed the factory front bumper and are making the required modifications to install the new SG front bumper and skid plate.

Under the Rover we have started to gut the stock suspension to make room for the new springs and Bilstien remote reservoir shocks.

Here you can see we have removed the stock bumper and spoiler and added a SG winch mount front bumper and skid plate to match the rear bumper.

We also modified the bumper to be able to accept a new Warn 9500HS winch, and then we remote mounted the control box behind the grill for a nice clean looking front end.

The winch control point is on the grill on the LH side of the vehicle for easy access when plugging in the controller, and this location offers little chance of accidentally winding up your control cable in the winch.

Inside the Disco II the tear down continues as we make room and run wires for all the additional equipment. We will be adding everything from a battery cross over system for the twin Optima batteries to Hella driving lights, so a lot of switch locations need to be found and some custom parts need to be built so that all the add ons can work correctly, and look at home along side the factory interior.

Now that we have the basic suspension installed we rolled the Disco out to make sure the stance was correct and that it was level. Everything looks great so now it is on to our RTI (Ramp Travel Index) ramp to see what we need to do for shock locations and any other clearance issues.

Once back inside the additions continue. Here you can see the 3 Hella 4000 lights have been added and wired up with new heavy duty relays to the factory driving light switch. This gives you the power of these killer off road lights, but keeps the clean look and functionality of the original interior. We have also added a new billet fairlead for the winch along with new winch rope, a swivel and a latching hook. The ECR ROX recovery points have also been fabricated and sent to our paint department. They will be installed on the front bumper soon. The green tape isn't permanent, it is used to protect bumper while we work on the Rover.

In the rear of the Rover the tear down also continues. We need to run wires in these areas for the Hella twin lamp work/reverse light and make the mounts for the new on board air compressor.

This image shows the completed front suspension. The Bilstein shocks have been installed as well as the longer bump stops and everything is finalized. The longer stainless steel brake flex lines will be added shortly.

To locate the remote reservoirs for the Bilsteins is tricky in the confines of the Disco II engine bay, but by moving a few things out of the way we were able to get it into a good position that keeps all the other systems serviceable. Above you can see the LH shock reservoir mounted on our newly fabricated and painted bracket.

On the RH side things are tighter as there is even less space, but by making some changes to other brackets in the area we have made the reservoir location work well and not cause problems with the other systems, as you can see above.

Speaking of tight spaces, because the windscreen washer bottle on a Disco II is located under the bumper on the LH side (we removed the stock bumper) we had to relocate the washer bottle along with all the plumbing and wiring for the washer systems. Here again, newly fabricated brackets and fresh paint make the system look as close to factory as possible.

To stuff even more items into the RH side of the engine bay we also added a dual Optima battery set up to keep the electrical system up to snuff. New mounts were fabricated under the batteries to hold hem up and a new hold down was constructed to keep them in place while on the trail. The dual battery system will be controlled with a remote cross over switch that will be mounted inside the Rover so that the Rover can be run on 1 or 2 batteries so extra juice will always be on hand when it is needed.

To control the ARB air lockers on the Disco we have fabricated a small overhead pod that blends in with the factory overhead pieces. Here you can see that we have relocated the interior light on the factory panel a few inches and fabricated a spacer so that when it is installed it will not touch the sunroof motor (green arrow) underneath it. We then fabricated a small pod that holds the switches for the air locker system that mimics the look of the sunroof control panel for a nice clean install. The locker switches will now be within easy reach, they look like a factory addition and they don't cause problems with any other system.

To control some of the other new additions we have added a 3 way switch and a battery cross over control, seen above. The 3 way switch controls the new work light and the battery cross over allows you to control the dual battery set up under the hood.
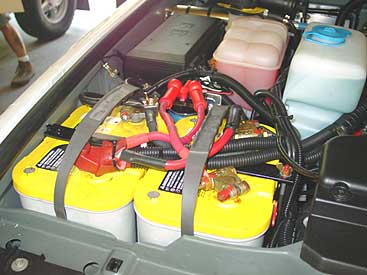
In one mode the batteries are run together for max power, in another mode they are not linked, and in the normal mode they are only linked together when the Rovers ignition is on, therefore keeping the second battery "in reserve" when the key is off. This helps in case you leave your lights on too long you can get a "jump start" from the second battery just by flicking the switch. Above you can see the wiring for the dual battery set up with all custom cables that are made to the correct lengths to connect everything securely. You can also see the custom bracket for the cross over relay just behind the batteries.

The rear lamp also has different functions. Flip the dash mounted switch to position 1 and the light comes on to help you load gear or camp. Hit position 2 and the light comes on and off as you select reverse gear, giving you great light for backing up on or off road. The 3rd position turns the light off completely. This makes for a nice flexible package and good use of the Hella twin lamp set up.

Here you can see the rear shocks have been mounted. The tests on the RTI ramp showed that the shocks needed a different mounting location than the stock Disco offered, so we fabricated a set of drop mounts for the frame of the Rover and welded them into place. This allows the shock to travel in the correct location and gives the max extension and compression for both on and off road uses.
One more thing to notice in this image is that the rear ARB locker has been installed into the differential with a new 4.11 ring and pinion. We also eliminated the factory rubber drive coupler in favor of a standard U-joint type drive flange. The new CV rear driveshaft will be installed soon.

The shocks external reservoir was then mounted to the rear section of the Rover with a custom bracket to hold it all in place securely. In this image you can also see the new longer stainless steel brake flex lines in place.

To handle the extra stress from the ARB locker we also installed a new set of GBR heavy duty rear axle shafts into the rear axle, making this Rover as tough as possible and nearly ready for the trail. Next we move onto the front ARB locker and setting up the new air compressor system.

As the larger locker work is done under the Rover, small items also continue to get added to the Disco II. Here you can see we have added a pair of ECR ROX recovery points to the front bumper. These units will take a standard 5/8" shackle and allow for tons of flexibility when using your winch and recovery gear. You can use them for turning blocks, put a strap on them, etc., by using a standard 5/8" shackle the possibilities are many.

Here you can see the front axle is being torn down to get ready to remove the front differential. Now that the axle shafts and the front driveshaft have been removed we can remove the nuts and pull out the diff to get it on the bench and ready for the new GBR 4.11 ring and pinion and ARB air locker.

Once the diff is out and on our bench we can strip it down to the bare case and get it ready for the upgrades. As this is a gearing change (3.54 to 4.11), as well as a locker install, we not only need to change the center section, but we need to remove the pinion and install the new 4.11 pinion and set the pinion depth so that the gears will ride correctly for long term operation and smooth quiet running.
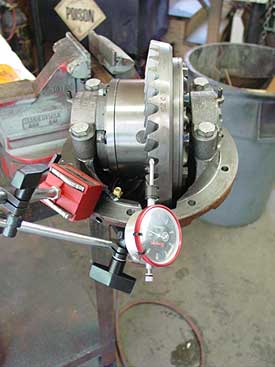
Here you can see the new ARB locker and GBR front ring and pinion have been installed and are being test fit for proper alignment and lash. Getting these specs right the first time means a long lasting and quiet gear set.

The green arrow above points to the ECR exclusive air line connection in our ARB installs. In the ARB suggested way of installing a locker, the air line that feeds the locker inside the diff can loosen up if you remove the air fitting on the outside of the diff. This can mean for something as simple as changing an air line, you might have to pull your entire front end apart to fix the internal air line, so there is potentially hours on the trail (if you have the tools) vs. a few minutes to fix an air line. In the ECR set up we drill the diff case and install a fitting on the inside (green arrow) and mate the inner line to that. On the outside we use another fitting, separate from the internal one that allows you to remove or install your supply air line with ease, and without ever having to dig into the differential. Why do we do this? Because in off road gatherings we have seen the worst happen, and then we come up with solutions to cure those problems.

To add some protection to the underside of the Rover we have installed the front skid plate and added a front diff guard (seen above).

The rear axles weak point is also treated to a diff guard so that just in case a rock gets into the wrong place, it won't puncture the axle case and cause a ring gear failure. These guards are cheap insurance for what can be a really nasty, and costly, trail failure.

Another weak link on a Disco II is the tie rod. It hangs down as nearly the lowest point of the undercarriage. To fully protect it we have fabricated an ECR ROX tie rod guard that is much like our Defender unit, but a new design that will fit on a Disco II. You can see the newly fab'd unit above just after PPG epoxy primer and paint. Once this is installed it will fully protect the tie rod from harm. You could even jack up the vehicle by it if you wanted to it is so tough.

Back underneath the Rover we have installed the air lines that run to the ARB air lockers, and the new drive flange that will allow us to remove the factory rear driveshaft and run a new Dana-Spicer heavy duty CV driveshaft in its place.

Inside the Disco II we have started the install of the new air source, a Quick-Air III compressor. This system will run the air lockers and also allow the customer to inflate tires after beach runs with ease. The air tank and wiring for the system will be installed shortly, then we will put the rear interior back together.

The front section of the Rovers interior is already back together. The new ARB switch pod and the custom wiring harness have been installed, tested and this area is good to go.

One of the goals at ECR is to make additions look like they belong, not like add ons. As you can see in this Disco II interior, there are a number of controls for equipment that is not factory, but the interior does not look cluttered or like some guy from the local auto parts store went crazy with goofy switches and plates on top of, or under, the dash. It looks clean and functional, the way we like it.

Here you can see the new ECR ROX tie rod guard installed. It is clean and functional and takes up as little ground clearance as possible, unlike large skid plates. It nicely protects what needs to be protected.

As you can see from this head on shot of the Rover, with the correct set up, all the vulnerable parts are protected and there are no longer any weak links hanging down under the Disco II. So in case of a rock or stump being put in the wrong place by the driver while off roading, no harm will come to the steering system.

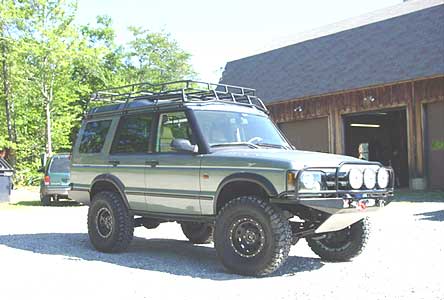
This image shows the nearly completed Disco II. Still to come are rims and tires, but even with the stock tires this Rover is looking ready for the trail.

Here you can see that the remote air tank has been installed and all the wiring and plumbing for the air system has been put in place.

Once the system was tested we then reinstalled the interior panels to give the air system a totally hidden look, it looks like a stock Disco II, but it isn't.

A small panel was fabricated that houses an air pressure gauge so that you can monitor the system, and a standard air chuck so that you can plug in your air hose into the air supply.

Once plugged in, the air hose easily reaches all 4 tires to pump them back up to street pressure with ease after a day on the beach or a day on the trail.

In the front of the Disco we added clear lexan covers to the Hella 4000s to protect them from on and off road hazards. A simple install, but it just might save some big dollar lights from harm.

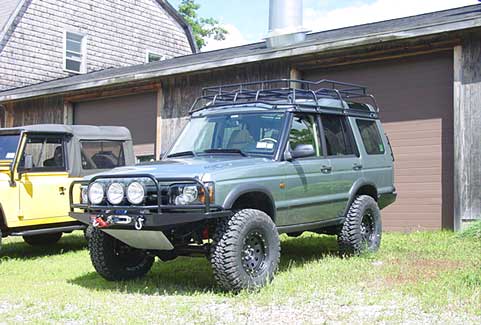
Here you can see the Rover during the on road tests. The new simulated bead-lock rims have arrived and been installed with a set of Good-Year MTRs in a 305/70R16s.
Now that the rims and tires have been installed, the true look of this Discovery project can be seen, and it looks great, and it still drives smooth and steady down the highway at freeway speeds and above.

To be able to fit a 305/70R16 on the rear door of the Discovery II we have fabricated a mount that bolts to the existing tire carrier with no modifications.

It raises the mounting location of the spare so that the larger tire will clear the bumper and allow the door to open and close properly.

We made it as tall as possible so that if the customer goes with an even bigger tire, the same spare mount will be able to be used, even with a 35" tire.
Here you can see the finished project ready to head back to Long Island, New York. It has just about every trick you can install on a Discovery II, and a few you've never seen before. If you have upgrades or custom work that you'd like done to your Discovery, contact ECR. We'll be glad to help make your Discovery stand out in a crowd, just like this one does.
East Coast Rover Co.
21 Tolman Road
Warren, ME 04864
email: ecrover@midcoast.com