Please be aware that ECR is now a Defender repair and modification shop only.
We no longer work on Range Rovers, Discos or Series Rovers.
These pages are from work we did in the past and left up for your enjoyment.
1965 Series IIA MOD 109 Pick-Up
Frame swap and bulkhead restoration
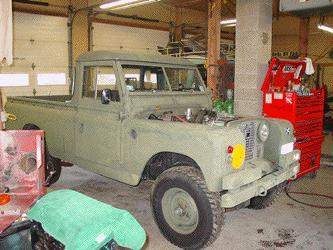
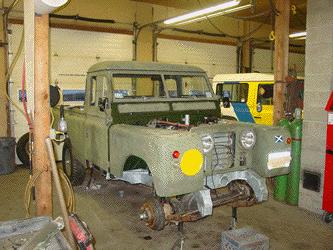
This 109 M.O.D. (Ministry Of Defense... aka British Military) has come to us from Cape Cod for a new galvanized frame and restoration of the bulkhead. This 109 has seen a very hard life over its 38 years, but once we get the new galvanized chassis installed, and get the bulkhead rust taken care of, the owner can pick away at the other work that needs doing, knowing that he is putting effort into a 109 with a solid backbone that will end up a great final product down the road.
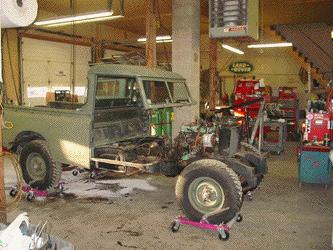
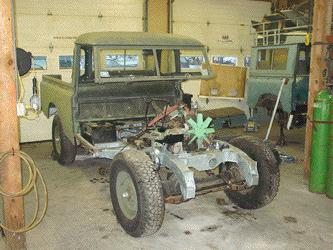
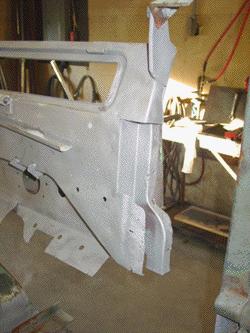
The first step is to evaluate the 109 and then have a chat with the owner to see just what he does, and does not want us to do. Once the work orders are decided we begin by stripping the body off the frame. Normally we'd use our frame swap system to get the chassis into this 109, but 2 things mean that we can't in this project. #1, we need to remove the bulkhead and strip it of all its parts for rust repair and #2, the 109 has been taken apart before and not all the needed bolts and hardware are in place, so the body will not support it's own weight. The solution is to leave as much together as possible (remember the owner plans to complete the restoration himself) so that it fits the budget. In the image above you can see we have removed the front clip (front clip means hood, radiator support and fenders) and stripped out the bulkhead. Next we'll lift the remaining body parts as a unit and then work on tearing down the rolling chassis.
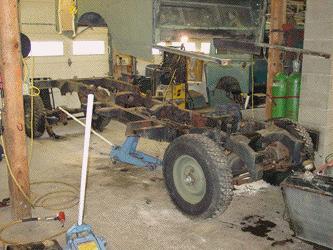
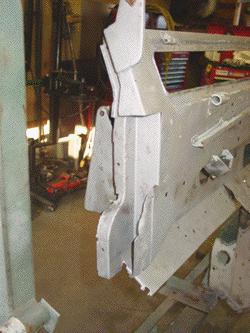
Here you can see the rolling chassis with the drivetrain removed. As the body is off we can lift the drivetrain out in one piece with even the radiator and the driveshafts still attached. In these cases we do suggest that major work is done at this time, items such as a new clutch or exhaust sure would be easy at this stage, but we do whatever the customer desires and in this 109's case it is just rust repair. The chassis on this 109 is in sad shape, it has numerous poor repairs and someone even filled the rear section of the frame with fiberglass body filler. The good news is the old chassis is headed for the scrap pile and the new galvanized chassis will be put in its place for strength and long life.
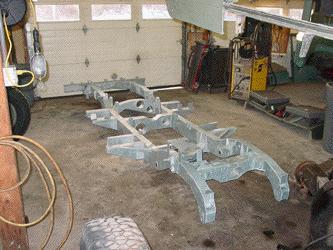
Speaking of new galvanized chassis, here it is shown in the image above. This chassis is correct for the 109 as it has the military rear crossmember as well as different spring mounts as the military (or M.O.D.) 109s had. Next we'll get the axles under the new chassis and install the drivetrain, and then we'll get the rusted bulkhead into the bulkhead jig and tackle that repair. Once these 2 structural items are done on this 109 it will have come a long way from a rusty Rover, to being a great restoration candidate with a ton of potential.

This image shows the axles and suspension being set up under the new galvanized frame. As this is not a restoration, the axles are bolted back in the way they were. They have some leaks and some work needed, but the owner plans to do that work himself. That is the beauty of ECR, we'll gladly do as much or as little as you want. We are happy to tackle the heavy repairs and then get this 109 back to its owner to finish up the rest of the work needed.
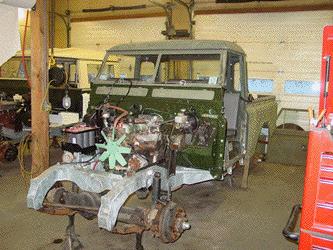
Here you can see that the 109 is starting to take shape again. The drivetrain has been re-installed into the new chassis and the rear body section has been put back on. We've got a lot of small work orders to get the 109 up and running correctly, such as sorting out the twin tank fuel system that had been bodged together over the years, correct some wiring problems and replace some other rusted items. We also did a few upgrades to ensure long life for the 109, such as installing all stainless steel brake lines. This 109 will likely see beach use on Cape Cod, so stainless brake lines are a great addition to make the 109 safe and rust resistant. Next step is to get the bulkhead (or firewall) back into shape.
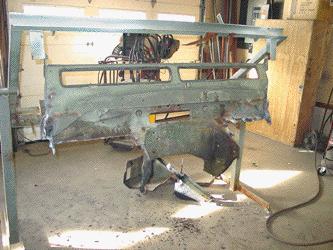
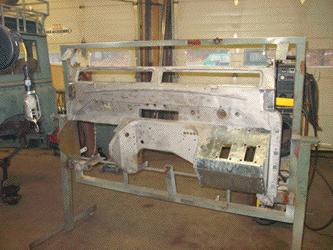
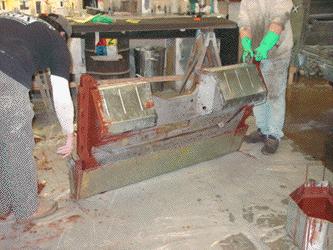
The image above shows the 109's stripped down bulkhead in our bulkhead jig. The jig assures that all the bolt points, floors, door posts, etc are all in the correct locations as the factory intended. This bulkhead is a rough one. We've cut away the floor boards, well, actually the LH floor board fell out when we picked up the bulkhead, it wasn't attached to the rest of the bulkhead and gotten rid of as many of the rust panels as possible. The next step is to sandblast the upper hinge areas of this bulkhead. Unfortunately these areas are loaded with polyester body filler and a lot of the steel appears to be rusted away. This one will definitely need a lot of custom fabrication, but we'll be able to get it back into shape. For more information about Series IIA bulkhead repairs go here.

Once the really rusty parts are cut away, we then media blast the firewall. This usually uncovers more rust and all the hidden repairs that lurk under nearly 4 decades of paint and body filler. The image above shows this 109's bulkhead just after a quick blasting.
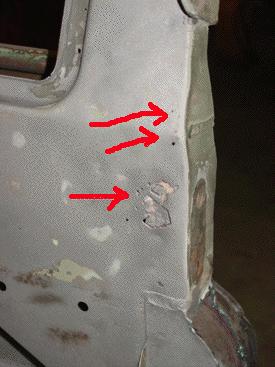
In this bulkhead we uncovered some hidden rust and previous poor repairs, as is usually the case in a 38 year old vehicle. The 2 upper red arrows in the image above point to holes in the bulkhead's sheetmetal. This area will need to be cut away and new steel put in it place, because these pin holes, although small right now, point to more rust hiding underneath. This is the main reason that we "dunk" our bulkheads, so that this rust, that comes in from behind, can't form again. The lower red arrow points to a large area of through rust near the upper door hinge. The bulkhead has the same problem on both sides. This rust was untreated and just covered up with body filler (commonly called bondo) and then painted to hide the damage. This is a real common way for people who sell Rovers to hide this damage, so if you are looking at a Rover, bring a magnet and check to see that you don't have any "bondo" in the bulkhead in these areas. If bondo is present the magnet won't stick very well, and if you have a lot of bondo, the magnet won't stick at all! So the bad news is that this bulkhead needs a lot of work. the good news is that we can fix it, and make it better than the day it rolled off the assembly line.
Here you can see the bulkhead after all the rusted areas have been cut away. The areas to be repaired have now been fully media blasted back to white metal. There isn't much of a bulkhead left, but it is enough to save. You may ask yourself, "Why not just replace the bulkhead?" The answer is that almost any bulkhead you find has rust, and if it didn't it would still be in the Rover and doing it's job, so restoring a bulkhead is the only true way to get a rust free bulkhead. If you buy another used bulkhead, if you could locate a good one, you'd just be getting into a different set of problems. We wish we could locate NOS (New Old Stock) Series II and IIA bulkheads, but they just don't exist, plus, our restored bulkheads are better and longer lasting than even a NOS SIIA bulkhead. Our uses of galvanized pieces and thinker steel, mean they'll outlast an originals by a wide margin.
These images show close ups of the Left and Right upper door hinge areas. As you can see the rusted steel and bondo have been removed and now we will begin to reconstruct these areas by hand and make them better than new.
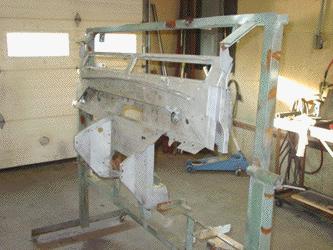
The image above shows the LH upper door post area with the rough steel work done, and as you can see, it is all steel, no bondo or body filler will be used. The area will now be finished off with the correct hinge holes and smoothed to look original. It may look simple, but there are 5 small hand crafted patch panels that were needed to get this area back in shape and keep all its factory structure in tact. You can also see that the LH door post has been installed as well as the new galvanized upper floor section, both of those items now await welding into place.
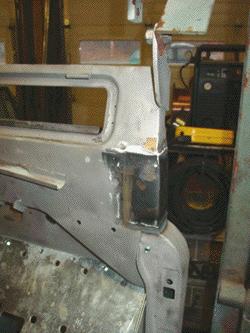
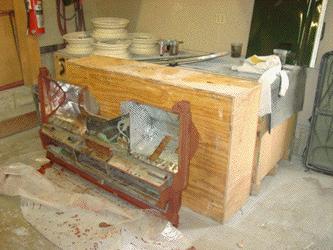
Here you can see the RH kick panel, foot and door post have been installed. The bulkhead is starting to look like a Land Rover piece again. Once all the fabrication is done it will be blasted again to remove all traces of the old military paint, and then "dunked" in our dunk tank system and primed and painted in the customer's color choice of gray.
This image shows the 109's bulkhead in the third stage of the "dunk tanks". As you can see both the Left and Right door post areas have been submerged in rust resistant primer, and now the entire top section is getting fully immersed in the same tick primer so that the bulkhead will have a good shot at keeping rust away from inside and outside.
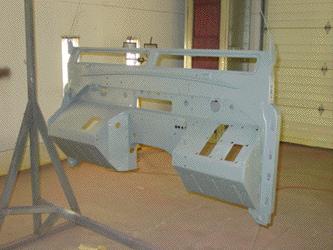
The image above shows the completed bulkhead after being "dunked". It will now be prep'd and painted in the customer's color choice and then installed back into the MOD 109.
Here you can see the bulkhead has been seam sealed and primed with multiple coats of PPG epoxy primer. This gives the outside of the bulkhead excellent corrosion resistance and when combined with a new galvanized chassis, it will make this 109 last a long long time.
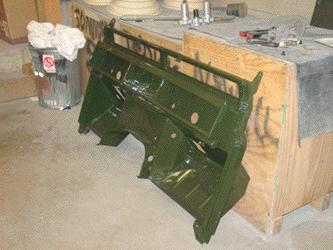
This image shows the completed bulkhead ready for installation into the 109. Freshly painted with 3 coats of the customer's choice of Bronze Green, the bulkhead will now be set up on the new galv. chassis and all the systems will be hooked up to make the 109 road ready, and ready for delivery back to the customer so that he can finish up the refurbishment of the Rover. Take a look a few images above and witness the condition of this bulkhead when it arrived at ECR, and now it looks this good. You can search high and low for a rust free bulkhead, or we can take your existing bulkhead and make it better than new. The choice is simple... ECR.
Here you can see we have installed the bulkhead back into the 109 and have started to put things back together. The floors have been installed, steering parts and a new wiring harness has been laid in. The old harness had some past repairs and a few melted wires, so it definitely wasn't something you want to go back in with such extensive work going on. Next we'll get the systems hooked up and bleed the hydraulics.
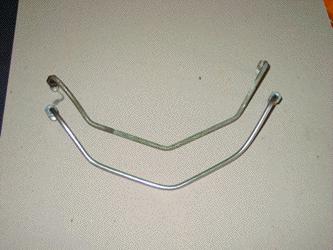
Speaking of hydraulics, the image above shows the front brake lines for the MOD 109. For longevity we are replacing the brake lines with stainless steel, and above you can see the lengths we go to to make the lines correct for your Rover project. The old line at the top is virtually the same as our new stainless steel line, but ours will never need to be replaced. With all new lines like these the brake system will be bled and double checked for any air in the system (a common problem in 109 front brakes).
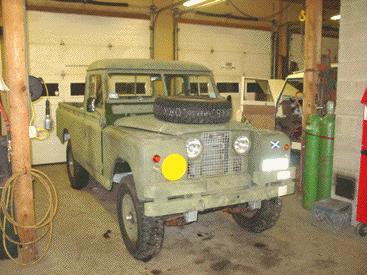
Above you can see the MOD 109 is starting to take shape. We've had to do quite a bit to get this 109 back together, and there is still more to do once the owner gets it back, but things will be in much better order now so that he can enjoy the 109 and drive it while he goes after the remaining work. We've correctly lined up the bulkhead and body so that the doors will close properly, replaced a lot of broken and non-standard parts and made some nice additions like new trouble free wiring, stainless brake lines and a rust free bulkhead. Next we'll get the rest of the body in place and get the 109 fired up and back to its owner.
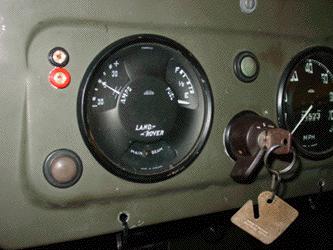
This 109 also had a fuel gauge that wasn't working. These MOD 109s had twin fuel tanks located under the driver and passenger seats and had a manual fuel cross-over lever on the bulkhead. Someone had installed a new style sending unit on the RH tank and left an old style on the LH tank. Problem is these these two sending units don't work together, and an even bigger problem is that they installed the wrong version of sender, so it was all messed up. The old style gauge will not function with the new style sending units, and unfortunately you can't get replacement SII/IIA sending units anymore, so you have to swap everything over to the Late SIIA/III style units. In the image above you can see that rather than swapping out everything for SIII style parts, we have modified a SIII fuel gauge to use the SII/IIA face, so that the Rover still looks as stock as possible, but can now have a working fuel gauge to read both LH and RH tanks. Some of the other details we attended to on the dash area are: The red and black 12v outputs (called inspection sockets in Land Rover terms) were missing, so along with the new wiring harness we installed them. The dash warning lights bezels commonly lose their "staying power" for being clipped into the dashboard and keep falling out. Someone had tried to fix this by putting wire ties behind them, but this doesn't work, so we repaired the warning light bezels correctly so that they stay in the dashboard correctly and can be removed if need be. Someone had also bored out the threaded inserts that hold the dashboard and vent flap controls in place, so we repaired all those so that the 109 can have a very nice, clean and stock looking dash, without lots of odd screws and such.
Here you can see the bulkhead systems have been installed and tested and now the front bodywork is being installed. Soon the 109 will be ready to head back to MA so that the owner can continue the restoration.
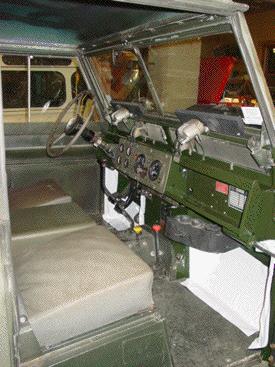
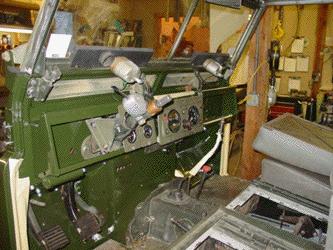
This image shows the completed interior. It is a MOD 109 so it is pretty bare bones, and it needs some more things to finish it up, but the systems are all now in good working order, and the bulkhead is rust free, that is a major step in the right direction from when we started. The white stuff you see on the bulkhead floors is a protective film we use to keep the paint looking good. This 109 doesn't have floor mats, so we use this to protect the paint prior to delivery and during road tests. The customer will simply peel it off when he takes delivery.
There you have it, a 38 year old MOD 109 that has been saved from the clutches of rust and poor quality previous repairs, and given a new lease on life. The 109, shown here just after some road testing, is now ready to head back to Cape Cod for further work by the owner to turn this Rover into a great piece.
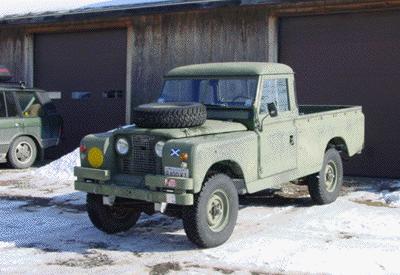
The good news is now that with a rust free bulkhead, rust resistant stainless brake and clutch pipes, new wiring, HD alternator AND a new galvanized frame, this 109 will be ready for the long haul and will be well worth the further effort the owner will put into it.
If your MOD or civilian Land-Rover needs anything from a full restoration, to just some serious "sorting out" like this 109 did, call ECR... we'll be glad to help make your Rover as good as this one.